
Danny Gonzalez
Verified Expert in Engineering
Danny是一名全栈软件工程师,拥有7年以上的项目管理和构建web和移动应用程序的经验.
Previously At

Danny是一名全栈软件工程师,拥有7年以上的项目管理和构建web和移动应用程序的经验.
知道用户的位置是有用的信息 many applications we develop and use today. 有很多流行的基于位置的应用程序让我们的生活更轻松, 同时也改变了我们使用这些服务的方式. 广受欢迎的应用程序Foursquare就是一个例子, 经常光顾某家公司并“签到”的用户通常会获得折扣吗. 优步,它可以帮助你用手机打车,比普通出租车的价格更低. The list is large and still growing.
In this article, 我们将构建一个简单的Android应用程序,使用Android的Google Location Services API来确定用户的纬度和经度. When developing Android applications,有几种方法可以获得用户的位置.
The package “android.location” 自从安卓系统首次推出以来,它就已经可用了,它让我们能够访问位置服务. 这些服务允许应用程序获得设备地理位置的定期更新.
该软件包提供了两种获取位置数据的方法:
LocationManager.GPS_PROVIDER: Determines location using satellites. 根据条件的不同,此提供程序可能需要一段时间才能返回位置修复.
LocationManager.NETWORK_PROVIDER:根据附近基站和WiFi接入点的可用性确定位置. This is faster than GPS_PROVIDER.
当您寻找用户位置时,您必须使用这些提供商及其可用性. 理想情况下,您可以使用NETWORK_PROVIDER获得第一个位置, which might not be as accurate, but is much faster. 然后,您可以尝试通过使用GPS_PROVIDER侦听更好的定位来提高准确性.
这个包提供的api是相当低级的, 并要求应用程序的开发人员处理更精细的细节,以优化的方式确定何时请求位置数据和调度对API的调用. 改善基于位置的系统服务的开发体验,简化开发位置感知应用程序的过程, 谷歌推出了一种使用Google Play服务请求用户位置的新方法. 它提供了一个更简单的API,具有更高的精度,低功耗的地理围栏等等.
Google Location Services API, also known as FusedLocationProviderApi, 谷歌推荐的获取用户位置的方法是什么. It provides the best accuracy based on our needs. 与之前的API相比,使用这个API的一些优点是:
简单性:与以前的API不同,您不再需要处理多个提供者. Instead, you specify high-level needs, such as “high accuracy” or “low power”, and it will take a suitable approach.
可用性:让您的应用程序立即访问最佳,最新的已知位置. 通常这些信息是很容易得到的,你只需要问一下就可以了.
电源效率:最大限度地减少应用程序的功耗.
Versatility: Meets a wide range of needs, 从前景使用-需要高度精确的位置数据, 到后台使用-只需要周期性的位置更新与微不足道的电力影响.
让我们使用这个API构建一个基于位置的Android应用程序. 为此,我们将使用Google推荐的用于Android应用程序开发的IDE - Android Studio. 开始使用Android Studio非常简单. 他们的网站非常详细地描述了Android Studio的安装和配置过程, 包括如何引导你的第一个Android应用程序进行开发.
Android Studio should make things super-easy for us. However, 我们需要从配置构建脚本开始,并将Google Play Services添加为该应用的依赖项. This can be done by modifying the “build.gradle” file as follows:
dependencies {
    compile 'com.android.support:appcompat-v7:21.0.3'
    compile 'com.google.android.gms:play-services:6.5.87' // Add this line
}
在我写这篇文章的时候,Google Play Services的最新版本是6.5.87. 在开始之前,请确保始终检查可用的最新版本. 以防以后出现新版本,您决定为自己的项目更新它, 针对你支持的所有Android版本测试所有与位置相关的功能.
此时,我们应该能够开始为应用程序做实际的工作了.
android具有特定的安全功能,可以防止任何任意应用程序请求精确的用户位置. To solve this, we need to edit “AndroidManifest.xml” and add the permission we require for this application:
While we are at it, 我们还应该定义应用程序使用的Google Play服务的版本:
在访问Google Play Services提供的功能之前, 我们必须检查设备是否安装了Google Play服务, and that the version is the one we intend to use (6.5.87).
private boolean checkGooglePlayServices(){
	int checkGooglePlayServices = GooglePlayServicesUtil
		.isGooglePlayServicesAvailable(mContext);
	if (checkGooglePlayServices != ConnectionResult.SUCCESS) {
		/*
		* Google Play服务缺失或需要更新
		*  return code could be
		* SUCCESS,
		* SERVICE_MISSING, SERVICE_VERSION_UPDATE_REQUIRED,
		* SERVICE_DISABLED, SERVICE_INVALID.
		*/
		GooglePlayServicesUtil.getErrorDialog(checkGooglePlayServices,
		mContext, REQUEST_CODE_RECOVER_PLAY_SERVICES).show();

		return false;
	}

	return true;
}
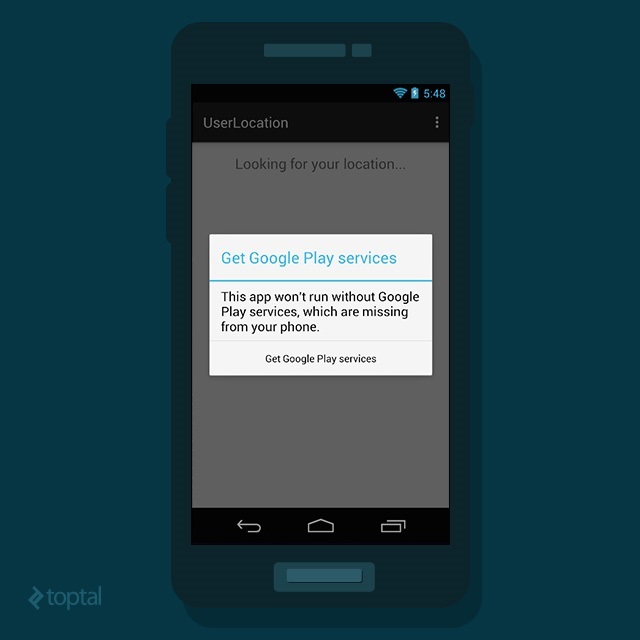
This method will check for Google Play Services, 万一手机没有安装它(这种情况很少见), but I’ve seen such cases), 它将打开一个带有相应错误的对话框,并邀请用户从Google Play Store安装/更新Google Play Services.
用户完成“GooglePlayServicesUtil”提供的解析后.getErrorDialog()”, a callback method “onActivityResult()” is fired, 所以我们必须实现一些逻辑来处理这个调用:
@Override
onActivityResult(int requestCode, int resultCode, Intent data) {
	if (requestCode == REQUEST_CODE_RECOVER_PLAY_SERVICES) {
		if (resultCode == RESULT_OK) {
			//确保应用程序未连接或未尝试连接
			if (!mGoogleApiClient.isConnecting() &&
					!mGoogleApiClient.isConnected()) {
				mGoogleApiClient.connect();
			}
		} else if (resultCode == RESULT_CANCELED) {
			Toast.makeText(mContext,“必须安装Google Play服务”.",
			Toast.LENGTH_SHORT).show();
			finish();
		}
	}
}
要访问Google api,我们只需要再执行一个步骤:创建GoogleApiClient的实例. Google API客户端为所有Google Play服务提供了一个通用入口点, 并管理用户设备与每个谷歌服务之间的网络连接. Our first step here is to initiate the connection. 我通常从活动的“onCreate”方法调用这段代码:
buildGoogleApiClient() {
	mGoogleApiClient = new GoogleApiClient.Builder(this)
		.addConnectionCallbacks(this)
		.addOnConnectionFailedListener(this)
		.addApi(LocationServices.API)
		.build();
}
By chaining a series of method calls, 我们指定回调接口实现和我们想要使用的Location Service API. The interface implementation, in this case “this”, 当连接到Google Play Services成功时,将收到异步“connect()”方法的响应, fail, or become suspended. 添加这段代码后,我们的“MainActivity”应该是这样的:
package com.bitwoo.userlocation;

import android.content.Intent;
import android.location.Location;
import android.os.Bundle;
import android.support.v7.app.ActionBarActivity;
import android.view.Menu;
import android.view.MenuItem;
import android.widget.Toast;

import com.google.android.gms.common.ConnectionResult;
import com.google.android.gms.common.GooglePlayServicesUtil;
import com.google.android.gms.common.api.GoogleApiClient;
import com.google.android.gms.location.LocationServices;


公共类MainActivity扩展ActionBarActivity实现GoogleApiClient.ConnectionCallbacks, GoogleApiClient.OnConnectionFailedListener {

	private static int REQUEST_CODE_RECOVER_PLAY_SERVICES = 200;

	private GoogleApiClient mGoogleApiClient;
	private Location mLastLocation;

	@Override
	onCreate(Bundle savedInstanceState) {
		super.onCreate(savedInstanceState);
		setContentView(R.layout.activity_main);

		if (checkGooglePlayServices()) {
		buildGoogleApiClient();
		}
	}


	@Override
	public boolean onCreateOptionsMenu(Menu menu) {
		// Inflate the menu; this adds items to the action bar if it is present.
		getMenuInflater().inflate(R.menu.menu_main, menu);
		return true;
	}

	@Override
	onOptionsItemSelected(菜单项){
		// Handle action bar item clicks here. The action bar will
		//自动处理点击Home/Up按钮,再见
		//当你在AndroidManifest中指定父activity时.xml.
		int id = item.getItemId();

		//noinspection SimplifiableIfStatement
		if (id == R.id.action_settings) {
		return true;
		}

		return super.onOptionsItemSelected(item);
	}

	private boolean checkGooglePlayServices() {

		int checkGooglePlayServices = GooglePlayServicesUtil
			.isGooglePlayServicesAvailable(this);
		if (checkGooglePlayServices != ConnectionResult.SUCCESS) {
			/*
			* Google play服务缺失或需要更新
			*  return code could be
			* SUCCESS,
			* SERVICE_MISSING, SERVICE_VERSION_UPDATE_REQUIRED,
			* SERVICE_DISABLED, SERVICE_INVALID.
			*/
			GooglePlayServicesUtil.getErrorDialog(checkGooglePlayServices,
			this, REQUEST_CODE_RECOVER_PLAY_SERVICES).show();

			return false;
		}

		return true;

	}

	@Override
	onActivityResult(int requestCode, int resultCode, Intent data) {
		if (requestCode == REQUEST_CODE_RECOVER_PLAY_SERVICES) {

			if (resultCode == RESULT_OK) {
				//确保应用程序未连接或未尝试连接
				if (!mGoogleApiClient.isConnecting() &&
					!mGoogleApiClient.isConnected()) {
					mGoogleApiClient.connect();
				}
			} else if (resultCode == RESULT_CANCELED) {
				Toast.makeText(这个,“必须安装Google Play服务.",
				Toast.LENGTH_SHORT).show();
				finish();
			}
		}
	}

	buildGoogleApiClient() {
		mGoogleApiClient = new GoogleApiClient.Builder(this)
			.addConnectionCallbacks(this)
			.addOnConnectionFailedListener(this)
			.addApi(LocationServices.API)
			.build();

	}


	@Override
	public void onConnected(Bundle bundle) {

	}

	@Override
	public void onConnectionSuspended(int i) {

	}

	@Override
	public void onConnectionFailed(ConnectionResult) {

	}
}
然后在我们的“onStart”方法中,我们调用“connect”方法并等待“onConnected”回调方法被调用:
@Override
protected void onStart() {
	super.onStart();
	if (mGoogleApiClient != null) {
		mGoogleApiClient.connect();
	}

}
The “onConnected” method will look like this:
@Override
public void onConnected(Bundle bundle) {
mLastLocation = LocationServices.FusedLocationApi.getLastLocation(
mGoogleApiClient);
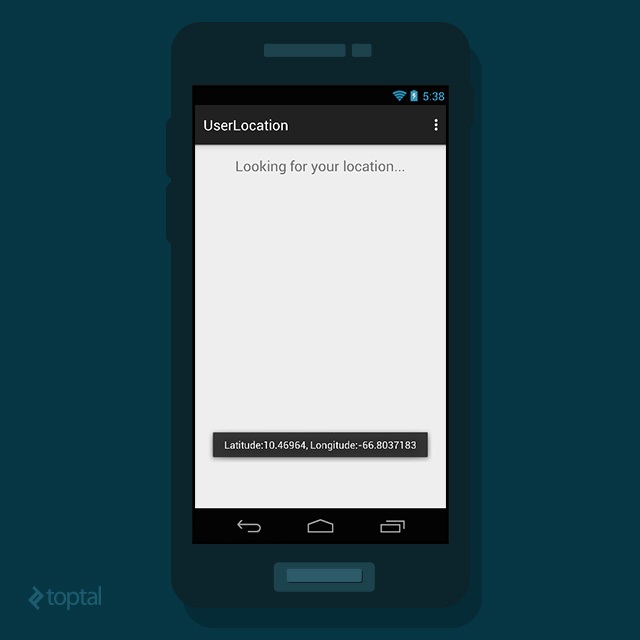
if (mLastLocation != null) {
Toast.makeText(this, "Latitude:" + mLastLocation.getLatitude()+", Longitude:"+mLastLocation.getLongitude(),Toast.LENGTH_LONG).show();
}
}
当Google Play服务连接时,这个回调被触发, 也就是说到那时我们应该知道最后一个地点了. 但是,这个位置可以为空(这种情况很少见,但并非不可能)。. 在这种情况下,我建议收听位置更新,这将在接下来介绍.
After you invoke “getLastLocation”, 您可能想要从融合位置提供程序请求定期更新. 根据您的应用程序,这段时间可能很短,也可能很长. For instance, 如果您正在构建一个应用程序,在用户开车时跟踪用户的位置, 你需要在短时间间隔内收听最新消息. On the other hand, 如果您的应用程序是关于与他的朋友分享用户位置, 你可能只需要偶尔请求一下位置.
创建一个请求非常简单——你可以在“onCreate”方法中调用这个方法:
protected void createLocationRequest() {
	mLocationRequest = new LocationRequest();
	mLocationRequest.setInterval(20000);
	mLocationRequest.setFastestInterval(5000);
	mLocationRequest.setPriority(LocationRequest.PRIORITY_HIGH_ACCURACY);
}
We instantiate a new LocationRequest object. Set the interval to 20 seconds (20000 milliseconds). 此外,我们将节流更新速率设置为5秒. 这告诉API每20秒提供一次更新(最好), 但如果在5秒内发生了变化, it should provide that too. Finally, we set the priority to “PRIORITY_HIGH_ACCURACY”, among the other available priority options: PRIORITY_BALANCED_POWER_ACCURACY, PRIORITY_LOW_POWER, PRIORITY_NO_POWER.
Once you have built the request, 在" onConnected() "方法被触发后,你就可以开始监听位置更新了:
protected void startLocationUpdates() {
	LocationServices.FusedLocationApi.requestLocationUpdates(
		mGoogleApiClient, mLocationRequest, this);
}
现在剩下的就是实现回调方法来满足 LocationListener interface:
公共类MainActivity扩展ActionBarActivity实现
		connectioncallback, OnConnectionFailedListener, LocationListener {

	// ...

	@Override
	public void onLocationChanged(Location location) {
		mLastLocation = location;
Toast.makeText(this, "Latitude:" + mLastLocation.getLatitude()+", Longitude:"+mLastLocation.getLongitude(),Toast.LENGTH_LONG).show();

	}

}
当您不再需要更新时,明确地停止侦听更新是很重要的, or if the user leaves your application. 下面的方法应该从“onPause”回调中调用:
protected void stopLocationUpdates() {
	if (mGoogleApiClient != null) {
		LocationServices.FusedLocationApi.removeLocationUpdates(
		mGoogleApiClient, this);
	}
}
… and disconnecting Google API:
@Override
protected void onStop() {
	super.onStop();
	if (mGoogleApiClient != null) {
		mGoogleApiClient.disconnect();
	}
}
As you can see, 在Android中实现位置感知应用程序背后的基本思想非常简单. Moreover, 使用既简单易用又易于理解的可用api, 为Android开发基于地理位置的应用程序应该是一件很简单的事情. 我们在这里构建的小样例应用程序就是为了证明这一点. You can find the complete source code for this on GitHub. Please note that to keep things simple, 应用程序没有处理" onConnectionFailed "回调方法.
希望本教程将帮助您开始使用谷歌定位服务API.
Located in Panama, NY, United States
Member since August 22, 2012
Danny是一名全栈软件工程师,拥有7年以上的项目管理和构建web和移动应用程序的经验.
 作者都是各自领域经过审查的专家,并撰写他们有经验的主题. 我们所有的内容都经过同行评审,并由同一领域的Toptal专家验证.
World-class articles, delivered weekly.
World-class articles, delivered weekly.
Join the Toptal® community.
